Building My First Bootable Kernel Pt. 1
Notes from my first OSDev Bare Bones milestone: building a freestanding x86 kernel, packaging it with GRUB, debugging cross-compiler and ISO issues, and running QEMU over SSH with VNC.
Foreword
I started working through the OSDev Bare Bones path as a first step toward building a small operating system for learning purposes. It was pretty fun being able to struggle with compiling a freestanding kernel, package it into a bootable ISO, run it in QEMU, and get text onto the emulated screen.
But honestly it is embarrasing to say I got stuck at the most basic steps, as we will see.
Some local machine details, usernames, and private network addresses are intentionally redacted.
Building My First Bootable Kernel
The first milestone sounded simple:
Hello, kernel world!
In normal application development, printing a string is not interesting. In early kernel development, that string represents a whole boot chain working correctly.
In my Systems Programming Course, we made terminals that utilized system codes to input and output, however, this is the first time I have actually started to "program the kernel" itself.
There is no process already running for you, no codes to connect to. There is no standard library. There is no operating system underneath the program. The bootloader has to load the kernel, the entry point has to be valid, the linker script has to place sections correctly, QEMU has to boot the ISO, and the kernel has to write directly to display memory.
This will become relevant later, but I chose QEMU instead of something like virtman because I am working remotely to my desktop via SSH.
The first milestone was less about the C++ code itself and more about understanding the toolchain and boot pipeline around it.
The Bare Bones Goal
The OSDev Bare Bones tutorial walks through a minimal 32-bit x86 kernel. At this stage there is no shell, filesystem, process model, memory allocator, or normal runtime environment.
The rough flow is:
boot.s        -> boot.o
kernel.cpp    -> kernel.o
linker.ld     -> myos
grub-mkrescue -> myos.iso
QEMU          -> boot the ISO
The assembly entry point provides the Multiboot header, sets up a stack, and calls into a C or C++ kernel entry function. GRUB handles the initial load. QEMU provides the emulated machine.
The kernel itself only needed to initialize VGA text output and print a short string. The value of the exercise was that every small step forced me to touch a lower layer than I usually work with:
- cross-compilation
- freestanding C++
- object files and linker scripts
- Multiboot validation
- GRUB ISO generation
- BIOS versus EFI boot paths
- QEMU display output over a remote SSH session
I will preface semi-intitially that I basically did not touch code at all, everything was provided from Bare Bones, but the amount of reading I had to do for the past 4 hours was intense, hence the environment was the real project for this part.
Separating the Toolchain Pieces
The OSDev cross-compiler guide recommends building a proper cross compiler for the target. That is the correct long-term direction, because a normal system compiler targets the host operating system. A kernel is not a Linux userspace program, even if it is being built from a Linux machine.
I initially treated the toolchain as one large prerequisite, but it helped to break the stack into pieces.
For early debugging, GNU binutils gave me the target-aware assembler, linker, and inspection tools:
mkdir -p ~/src ~/opt/cross
cd ~/src

wget https://ftp.gnu.org/gnu/binutils/binutils-2.42.tar.xz
tar -xf binutils-2.42.tar.xz
mkdir build-binutils-i686
cd build-binutils-i686

../binutils-2.42/configure \
  --target=i686-elf \
  --prefix="$HOME/opt/cross" \
  --with-sysroot \
  --disable-nls \
  --disable-werror

make -j"$(nproc)"
make install
Then I put the cross tools on my path:
export PATH="$HOME/opt/cross/bin:$PATH"
That provided tools such as:
i686-elf-as
i686-elf-ld
i686-elf-objdump
i686-elf-readelf
Understanding the -lgcc Failure
Later, when linking the kernel, I tried a command like this:
i686-elf-g++ -T linker.ld -o myos \
  -ffreestanding \
  -O2 \
  -nostdlib \
  boot.o kernel.o \
  -lgcc
The linker failed with:
ld: cannot find -lgcc: No such file or directory
collect2: error: ld returned 1 exit status
It meant the compiler driver was present, but the target libgcc runtime
pieces were not installed correctly.
For a small Bare Bones kernel, I was able to temporarily remove -lgcc:
i686-elf-g++ -T linker.ld -o myos \
  -ffreestanding \
  -O2 \
  -nostdlib \
  boot.o kernel.o
That worked only because the kernel was still tiny enough that the generated code did not require
helper routines from libgcc.
This is not a permanent fix. As the kernel grows, I expect that the compiler-generated helper functions can become
necessary for certain operations. But at this milestone, removing -lgcc helped isolate the
problem and keep the first boot target moving.
This is due to an issue I had when compiling binutils, I will have to revisit this later.
The broader lesson was more important than the workaround: linker errors usually describe a missing piece of the build model. The fix is not to randomly remove flags forever. The fix is to understand what the flag expects to exist.
C++ Needs a C Linkage Entry Point
Because I was using C++, the kernel entry point needed C linkage.
The assembly file calls a symbol explicitly named:
kernel_main
I learned that C++ normally mangles function names, so the exported symbol would not necessarily be named
kernel_main unless I told the compiler to use C linkage for that function.
The entry point should look like this:
extern "C" void kernel_main(void) {
    terminal_initialize();
    terminal_writestring("Hello, kernel world!");
}
The important part is scope. Only the entry function needs extern "C". The helper functions,
terminal code, constants, and implementation details can stay as normal C++ code.
A cleaner layout is:
#include <stdbool.h>
#include <stddef.h>
#include <stdint.h>

// Terminal state and helper functions live above the entry point.

extern "C" void kernel_main(void) {
    terminal_initialize();
    terminal_writestring("Hello, kernel world!");
}
That keeps the exported ABI requirement small and explicit.
Writing Directly to VGA Text Memory
The output path in the Bare Bones kernel uses VGA text mode.
Instead of printf or stdout. The kernel writes directly to the VGA text buffer:
static uint16_t* const VGA_MEMORY = (uint16_t*) 0xB8000;
Each screen cell stores a character and a color attribute. The terminal code tracks the current row, column, color, and buffer pointer. Writing the right values into that memory changes what appears on the screen.
A simplified version of the idea is:
uint16_t* terminal_buffer = (uint16_t*) 0xB8000;
That was one of the first moments where this stopped feeling like normal application programming. The display output was just memory. The kernel was writing to a hardware-defined address in the emulated machine.
One small detail also mattered: the starter terminal code does not automatically implement newline behavior. This:
terminal_writestring("Hello, kernel world!\n");
does not behave like a normal terminal newline unless newline handling is implemented in the terminal output function. For the first successful boot test, I kept the output simple:
terminal_writestring("Hello, kernel world!");
Newline support can come later. The first milestone was proving that the kernel reached its entry point and wrote to the screen.
Running QEMU Over SSH
The next problem had nothing to do with the kernel. I was developing on a remote Linux machine over SSH, but I wanted to see the QEMU display from my laptop.
Trying to let QEMU open a normal GTK window over SSH produced display initialization errors:
gtk initialization failed
The better approach was to use QEMU's VNC display output:
QEMU on the remote machine
        |
        v
VNC viewer on my laptop
The final command used a private overlay-network address, redacted here:
qemu-system-i386 \
  -cdrom ./myos.iso \
  -boot d \
  -machine pc \
  -vga std \
  -vnc <remote-tailscale-ip>:1 \
  -monitor stdio \
  -m 128M
Then I connected from my laptop with a VNC client:
<remote-tailscale-ip>::5901
The double colon matters for TigerVNC because it tells the client to connect to an explicit port.
QEMU display :1 maps to TCP port 5901, :2 maps it to 5902.
Before that worked, I also tried SSH local port forwarding:
ssh -N -L 5901:127.0.0.1:5901 <remote-user>@<remote-host>
That failed with a forwarding error:
channel 2: open failed: administratively prohibited: open failed
The useful interpretation was that the local tunnel command was not the entire story. The remote SSH server also has to allow that forwarding behavior. In this case, connecting directly over the private overlay network was simpler.
At that point, the QEMU display path worked... but I couldnt boot.
QEMU Ran, But the ISO Did Not Boot
Once VNC worked, QEMU started successfully. Instead of booting the kernel, it printed output like:
Booting from ROM...
iPXE starting execution...
Nothing to boot
Booting from Hard Disk...
Boot failed: could not read the boot disk
No bootable device.
It was honestly frustrating. QEMU was running, but the remote display path was working. After checking the files, I deduced that the failure had narrowed to the bootable ISO.
The first check was whether the ISO contained the expected files:
xorriso -indev myos.iso -ls /boot
xorriso -indev myos.iso -ls /boot/grub
The expected files were there:
/boot/myos.bin
/boot/grub/grub.cfg
So the ISO directory layout was not the main issue.
The real clue was inside /boot/grub. The ISO had EFI GRUB platform files:
x86_64-efi
but it did not have the BIOS GRUB platform files:
i386-pc
That was the boot blocker.
The Actual Fix: Install BIOS GRUB Support
I was using qemu-system-i386, which boots through a legacy BIOS path by default. For that path,
GRUB needs its BIOS platform files, usually under:
/boot/grub/i386-pc
My ISO only had EFI GRUB files. QEMU's BIOS firmware could not boot that ISO correctly.
The fix was to install the BIOS GRUB package and supporting ISO tools:
sudo apt install grub-pc-bin grub-common xorriso mtools
Then I rebuilt the ISO from a clean directory:
rm -rf isodir myos.iso

mkdir -p isodir/boot/grub
cp myos isodir/boot/myos.bin
set timeout=0
set default=0

menuentry "myos" {
    multiboot /boot/myos.bin
    boot
}
Into isodir/boot/grub/grub.cfg.
Then I rebuilt the ISO:
grub-mkrescue -o myos.iso isodir
After that, the ISO included the missing i386-pc platform files, and QEMU could boot it through
the BIOS path.
What I Learned
The hardest part of the first kernel milestone was not the terminal output code. The hardest part was understanding the full boot pipeline.
A tiny operating system still needs many pieces to line up:
cross assembler
cross compiler
object files
linker script
Multiboot header
GRUB config
GRUB platform files
bootable ISO generation
QEMU boot mode
remote display output
A whole hour spent on the dang missing i386-pc file.
My first OSDev milestone was just printing text to the screen. But I feel like I had learned a lot, I could not just move forward without documenting my struggles and what I learned at the least.
Outside of basic C++ functionality, I learned a little about kernel development, grub loading, firmware boot path, and emulator displays.
Appendix
Command List
rm -rf isodir myos.iso myos boot.o kernel.o

i686-elf-as boot.s -o boot.o

i686-elf-g++ -c kernel.cpp -o kernel.o \
  -ffreestanding \
  -O2 \
  -Wall \
  -Wextra \
  -fno-exceptions \
  -fno-rtti

i686-elf-g++ -T linker.ld -o myos \
  -ffreestanding \
  -O2 \
  -nostdlib \
  boot.o kernel.o

mkdir -p isodir/boot/grub
cp grub.cfg isodir/boot/grub/grub.cfg
cp myos isodir/boot/myos.bin

grub-mkrescue -o myos.iso isodir

xorriso -indev myos.iso -ls /boot/grub

qemu-system-i386 \
  -cdrom ./myos.iso \
  -boot d \
  -machine pc \
  -vga std \
  -vnc <remote-tailscale-ip>:1,password=on \
  -monitor stdio \
  -m 128M

(qemu) change vnc password enter_your_pass_here_lol
You need a password for Apple Screen Sharing.
Adding Support for Newlines to Terminal Driver
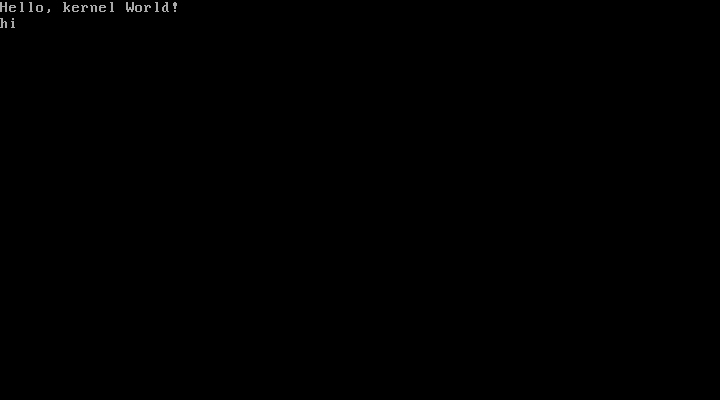
void terminal_putchar(char c)
{
    if (c == '\n') {
        ++terminal_row;
	    terminal_column = 0;
        return;
    }
	terminal_putentryat(c, terminal_color, terminal_column, terminal_row);
	if (++terminal_column == VGA_WIDTH) {
		terminal_column = 0;
		if (++terminal_row == VGA_HEIGHT)
			terminal_row = 0;
	}
}
I chose this method specifically because working backwards from kernel_main, no function utilizes char datatype except this. We do not have to go further from here.
Implementing Terminal Scrolling
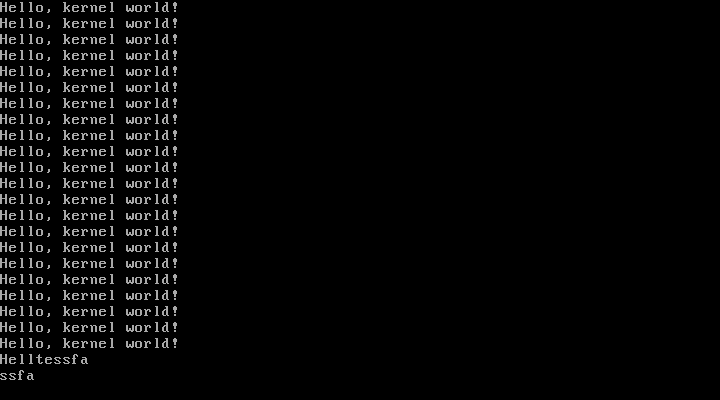
void terminal_scroll() {
    for(int i = 0; i < VGA_HEIGHT; ++i){
        for (int j = 0; j < VGA_WIDTH; ++j){
            terminal_buffer[i * VGA_WIDTH + j] = terminal_buffer[(i + 1) * VGA_WIDTH + j];
        }
    }

}

void terminal_putchar(char c)
{
    if (c == '\n') {
	    terminal_column = 0;
        if (++terminal_row == VGA_HEIGHT - 1) {
            terminal_scroll();
            terminal_row = VGA_HEIGHT - 2;
        }
        return;
    }
	terminal_putentryat(c, terminal_color, terminal_column, terminal_row);
	if (++terminal_column == VGA_WIDTH) {
		terminal_column = 0;
		if (++terminal_row == VGA_HEIGHT - 1) {
            terminal_scroll();
			terminal_row = VGA_HEIGHT - 2;
        }
	}
}